CS Help
Help booklet for common questions regarding CS resources, user access, etc.
- Welcome
- Accounts & Sign-in
- Courses
- CS Servers
- Software for Remote Access
- Technical Resources Available
- Wireless
- MyWeb Tutorials
- MyWeb Tutorials: Login to MyWeb
- MyWeb Tutorials: File Manager & HTML page
- MyWeb Tutorials: Database Creation
- MyWeb Tutorials: Create PHP/DB application
- MyWeb Tutorials: Git (Version Control)
- MyWeb Tutorials: Connect to DB remotely
- How To
- MyWeb
- NoMachine
- Notepad++
- SQL*plus ( to Oracle)
- Oracle Using Java and Python from Delta
- WSL
- JetBrains
- Gitlab
- VS Code
- How to Set Dynamic (DHCP) IP Address - Windows 10/11
- How to Set Dynamic (DHCP) IP Address - Mac OS
- Connecting to the ‘delta.cs.uwindsor.ca’ Server via SSH through Visual Studio Code
- Check and clean up large files in your home directory
- Graduate Printer
- PostgreSQL
- AV 300 Ouellette
Welcome
This is the on-line guidebook for computing resources for general use within the School of Computer Science at the University of Windsor.
Here you will find documentation showing you how to use the various tools available to you for your course work, research work, administrative work, or personal development.
Attention all students! We're inviting you to contribute by writing a how-to article. Share your knowledge and expertise with the community! The best submissions will receive an incentive. Start writing today!
Please send your submissions to accounts@cs.uwindsor.ca
All use of these facilities is subject to the University of Windsor Bylaws and Policies, in particular, you should become familiar with the Acceptable Use Policy under the IT Services Quick Link.
If you have any questions or problems using these resources, please get in touch with one of the technical support staff:
If you have questions or problems with this Web site's content, please contact the CS Technical Staff.
Please review the Passwords article containing important information about your CS and CAMPUS passwords.
Accounts & Sign-in
Articles related to UW accounts and access
Computer Science Access
For all your course work please log in to the server delta.cs.uwindsor.ca and not into cs.uwindsor.ca .
Methods to access the delta.cs.uwindsor.ca server.
- 1) SSH Remote Access
- 2) Using NoMachine
For Password issues, Please read the password page.
Passwords
CS Members
Definition
A UWinID and password is required to use the resources within the School. The UWinID must be "attached" to Computer Science, meaning that you must be taking a computer science course or a course hosted on our servers, be a computer science major, or a faculty or staff member employed in Computer Science. All active students and staff should have their own UWinID username and password, which is generated and maintained by the University of Windsor Information Technology Services department (ITS). People with an active UWinID and password, and with an attachment to the school of computer science resources, either through employee group, study major, or course enrollment are automatically granted access to the linked systems listed below. Specialized members of the general public, namely alumni, prospective students, event participants, school teachers, and employers may also be granted access to some resources.
UWinID and Passwords
Managing your campus password
You can manage your campus password by visiting UWin Account.
 |
Your UWinID DOES NOT include @uwindsor.ca. The identifier userid@uwindsor.ca, which is composed of the UWinID userid and the domain name uwindsor.ca, is your Microsoft account in the campus' Azure Active Directory tenant.
|
|
|
Your UWinID is to be used entirely in lowercase characters!
|
Password synchronization with Computer Science
When you change your UWinID password through UWin Account, it will synchronize automatically for CS servers that use LDAP authentication at regular intervals (every 15 minutes), with the exception of the following:
- CS Active Directory accounts
- DirectAdmin accounts
- Oracle Database Server accounts
To synchronize your passwords for the services listed above with your campus password, please use the CS Password Utility.
CS Password Utility
Managing your Computer Science Password
The CS Password Utiliity is an on-line self-service application designed to allow CS Members to reset their passwords and user accounts on systems and services within the School of Computer Science.
|
|
You MUST use this utility after enabling your campus UWinID, and each and every time you change your campus password.
|
|
|
You SHOULD use this utility whenever you experience trouble authenticating on CS resources.
|
 |
There are some characters you must not use in your campus password! In particular, you MUST NOT USE a FORWARD SLASH (/), BACKSLASH (\), SPACE, or DOUBLE QUOTATION MARK (") in your campus password. If you have ANY of these characters in your campus password, you MUST change your campus password immediately in order to use our systems!
|
Additional non-password related functions
This utility will also automatically resolve the following issues, if applicable:
- Remove your IP from the myweb.cs.uwindsor.ca server blacklist
- Unlock your Oracle account in the CS01 instance, if possible.
Session results

Linked Systems
- Computer Science Linux Desktop Servers
- Web Hosting services on myweb.cs.uwindsor.ca (websites, MySQL and @cs.uwindsor.ca email)
- cswifi Wireless Network(EAP authentication required, and checked against the CS Active Directory domain)
- CS Computer Lab Clients
- Cloud Storage (owncloud.cs.uwindsor.ca)
- Oracle Database (CS01 instance)now
VPN
The University of Windsor uses a firewall. Many protocols or ports are blocked by the firewall, so you may need to establish a connection through the campus Virtual Private Network (VPN) to access resources and data on the campus private network.
What does the VPN connection do?
The VPN connection tunnels network traffic over a securely encrypted connection. Once connected to the VPN portal, your device will receive a new IP address and IP route provided by the university and recognized internally by the campus firewall.
Why do I need to use the Campus VPN?
ITS Documents related to the Campus VPN


Download
Windows and macOS
Authenticate with your UWinID and password on the university's GlobalProtect Portal to get to the GlobalProtect Client download links.
|
|||
|
|||
Checking the Windows version
If you are running Windows, please check the version to determine if you should install the 32-bit or 64-bit version.

Press the Windows + Pause keys
Android, iOS, Chromebook and Windows UMP
Download the GlobalProtect Client from the respective device's app store.
Android and Chrome OS devices
|
||
iOS devices
|

Linux
Install openconnect using the package manager for your Linux distribution.
Connecting to the campus VPN
Using GlobalProtect Clients
Windows and macOS devices use the networklogin.uwindsor.ca portal.
Mobile devices, including Android, iOS, Chromebook, and ARM-based Surface tablets, use the mobilevpn.uwindsor.ca portal. Refer to VPN#ITS_Document_related_to_the_Campus_VPN for detailed instructions for setting up a connection on your device.
Using Openconnect with Linux
The Openconnect integration with NetworkManager does not properly open the connection to the portal. You must use the command-line for your VPN connection to work correctly.
Reserve a terminal window for the VPN connection, and run the command below, replacing userid with your UWinID, in the reserved terminal:
|
Linux, like mobile devices, uses the mobilevpn.uwindsor.ca portal.
PAN GlobalProtect HIP with open-connect
And because you are in Computer Science ...
You may notice a message like
POST https://mobilevpn.uwindsor.ca/ssl-vpn/hipreportcheck.esp
WARNING: Server asked us to submit HIP report with md5sum 923700b124549fa2954cc08845be3c60.
VPN connectivity may be disabled or limited without HIP report submission.
You need to provide a --csd-wrapper argument with the HIP report submission script.
this when you run open connect as shown in VPN#Using_Openconnect_with_Linux.
Host Integrity Protection provides an explanation. If you want to include the --csd-wrapper option, you will need to specify the location of the script required.
For Debian-based distributions, for example, you can find the location of the scripts like this
~$ dpkg -L openconnect|grep hipreport /usr/libexec/openconnect/hipreport-android.sh /usr/libexec/openconnect/hipreport.sh
To avoid the above warning on a Linux client you can use
Testing the VPN Connection
The ping command is the simplest way to test if your active VPN Connection is working.
Windows

- Press the Win + X keys on your keyboard
- Right-click on the Windows logo in the bottom-left corner of your desktop
In older versions of Windows 10, this menu will include shortcuts for the Command Prompt instead of Windows Powershell. Either is suitable for this test!

ping 10.10.10.10 results
Run
ping 10.10.10.10
to determine if the campus DNS server is available.

New VPN provider IP address
Run
ipconfig
to display the new IP address while actively connected to the campus VPN portal.

New VPN provided routes
Run
route print -4
to display the new IP routes while actively connected to the campus VPN portal.
macOS

This link can be found in the Terminal User Guide menu
Open a terminal and run
ping 10.10.10.10
to determine if the campus DNS server is available.
Your output should look similar to the Windows Powershell ping results above.
Linux

ping -c 5 10.10.10.10 results
Run
ping -c 5 10.10.10.10
to determine if the campus DNS server is available.

New VPN provided IP address
Using Debian, run
ip addr show tun0
to display the new IP address while actively connected to the campus VPN portal.
The network interface name may vary depending on the Linux distribution you use, but the IP will begin with the first two octets 172.18.

New VPN provided IP routes
Run
ip route
to display the new IP routes while actively connected to the campus VPN portal.
MFA
Multi-Factor Authentication (MFA) provides additional security for your UWin Account.
MFA is required for accessing MFA-protected services and apps, like Microsoft 365, from off-campus networks.
A UWin Account identifier userid@uwindsor.ca, is composed of the UWinID userid and the domain name uwindsor.ca; it is a Microsoft account in the uwindsor.ca domain of the campus' Azure Active Directory tenant.
ITS Documents
Options for secondary factors of authentication
Courses
COMP1400
Raptor is used by COMP1400. It is available on all the machines in computer science labs. Also can be used remotely using NoMachine Client.
Students can download the tool on their machines(Raptor).
RAPTOR is a flowchart-based programming environment, designed specifically to help students visualize their algorithms and avoid syntactic baggage. RAPTOR programs are created visually and executed visually by tracing the execution through the flowchart. Required syntax is kept to a minimum. Students prefer using flowcharts to express their algorithms and are more successful in creating algorithms using RAPTOR than using a traditional language or writing flowcharts without Raptor.
How to access Delta and using NoMachine Client

RAPTOR Avalonia Edition runs on MAC and Linux, More information is available on the landing page of the RAPTOR website.
COMP 3150
COMP 3670/4670/8677
COMP 2057 Prof. David Mayo
Before connecting to the server, please ensure that you have access to Computer Science resources.
Please visit
https://auth.cs.uwindsor.ca and synchronise your password.
Please use VPN to connect to campus, and also use VPN on the eduroam wifi.
The following resource is dedicated to Prof David Mayo's class.
Server: electron.cs.uwindsor.ca
Protocol to be used: SFTP ( Secure File Transfer Protocol)
This server only supports the secure FTP protocol. Please do not use FTP or SSH. This server will not provide you with a login shell even if the password is correct.
A screenshot of Filezilla on Mac


Check that I am logged on, you can see my remote site files ( I don't have any HTML files)

Command Line: sftp sanjay@electron.cs.uwindsor.ca

Additional information
https://help.cs.uwindsor.ca/books/cs-help/page/filezilla
COMP 3400
To run nvhpc on Delta
export PATH=/opt/nvidia/hpc_sdk/Linux_x86_64/25.11/compilers/bin:$PATH
export PATH=/opt/nvidia/hpc_sdk/Linux_x86_64/24.3/comm_libs/mpi/bin:$PATH
Compile your code
Thanks to Prof. Paul Preney for the test code vecadd.cpp
// This program is very simple. Set size in main to be a large number if
// needed.
// vecadd.cpp
#include <cstddef>
#include <iostream>
#include <vector>
#include <numeric> // For iota
#include <algorithm> // For transform
#include <execution> // For parallel execution policies
void check(std::ostream& os, auto const& value, auto const& should_be_value)
{
if (value == should_be_value)
os << "OKAY";
else
os << "NOT_OKAY";
}
int main()
{
using namespace std;
size_t const size{ 1'000'000ULL};
vector<int> a(size);
vector<int> b(size);
vector<int> result(size);
iota(a.begin(), a.end(), 0); // a = {0, 1, 2, ...}
iota(b.begin(), b.end(), size); // b = {size, size+1, ...}
transform(execution::par_unseq,
a.begin(), a.end(),
b.begin(),
result.begin(),
[](int x, int y) { return x + y; }
);
// Verify a few elements (optional)
cout << "result[0]: " << result[0] << ' '; check(cout,result[0],size); cout << '\n';
cout << "result[1]: " << result[1] << ' '; check(cout,result[1],size+2); cout << '\n';
cout << "result[size-1]: " << result[size-1] << ' '; check(cout,result[size-1],size-1+size*2-1); cout << '\n';
}MakeFile
Makefile
CXXFLAGS=-O3
NVHPC_CXX=nvc++
NVHPC_CXXFLAGS=$(CXXFLAGS) --c++20 -stdpar=gpu
NVHPC_LDFLAGS=$(LDFLAGS)
GCC_CXX=g++
GCC_CXXFLAGS=$(CXXFLAGS) -std=c++20
GCC_LDFLAGS=$(LDFLAGS) -ltbb
all: vecadd-nvhpc.exe vecadd-gcc.exe
clean:
rm *.exe
run: vecadd-gcc.exe vecadd-nvhpc.exe
echo "Running vecadd-gcc.exe..."
bash -c 'time ./vecadd-gcc.exe'
echo -e "\n\n\n"
echo "Running vecadd-nvhpc.exe..."
bash -c 'time ./vecadd-nvhpc.exe'
%-nvhpc.exe : %.cpp
$(NVHPC_CXX) $(NVHPC_CXXFLAGS) -o $@ $< $(NVHPC_LDFLAGS)
%-gcc.exe : %.cpp
$(GCC_CXX) $(GCC_CXXFLAGS) -o $@ $< $(GCC_LDFLAGS)
CS Servers
- The primary compute server is delta.cs.uwindsor.ca
- The primary webserver is myweb.cs.uwindsor.ca
Software Available on Delta
Based on the image below you can see the software available on delta.

How to use myweb
STEP 1
go to https://myweb.cs.uwindsor.ca/
and select the blue box option

STEP 2
Login with your UwinID and password

Note:
If you can't login, please sync your password at https://auth.cs.uwindsor.ca
Additional details can be found in this help article.
PhpMyAdmin
STEP 1
go to https://myweb.cs.uwindsor.ca/
and select the blue box option
STEP 2
Login with your UwinID and password

STEP 3
After logging in, under Extra Features, there will be an option of phpMyAdmin.

Delta.cs.uwindsor.ca
Delta is the School of Computer Science's main computing server.
You can reach Delta using any of these methods:
- The School dedicated Linux labs:
- Java Lab: ER-3150
- XLab: ER-3119
- 300 Ouellette
- From the web. https://nx.cs.uwindsor.ca (require VPN)
- SSH: ssh uwinid@delta.cs.uwindsor.ca (require VPN)
Delta is equipped with 2 x 64 cores Processors, 1 Terabyte of memory, and four GPUs (Nvidia A16)
Notes:
Software for Remote Access
Applications and programs commonly used to access the main computing server used by Computer Science Students. The primary server used for coursework is Delta ( delta.cs.uwindsor.ca ).
Mobaxterm
MobaXterm is your ultimate toolbox for remote computing. In a single Windows application. It is an enhanced terminal for Windows with an X11 server, tabbed SSH client, and network tools. The free home edition is available at Mobaxterm.
The free Mobaxterm Home Edition with full X server and SSH client is available for Windows.
Download
 |
Download Mobaxterm Home Edition for Windows |

Installing Mobaxterm
The Installer is provided as a ZIP file; save it and open it. Extract all the files (*.dat and *.msi) into a directory. Go to the extraction sub-directory and run the MSI installer. Accept all the default settings.
Using Mobaxterm
A full description of Mobaxterm's features
SSH
Configuring a session to connect to delta.cs.uwindsor.ca

Enter password on the second window

X11 Forwarding
The requisite X server is embedded!
- Mobaxterm has an embedded X server with X11 forwarding enabled by default, so nothing else is required to run GUI applications.
SSH using Mac OSX
Launch Terminal from the Application/Utilities.

You will see the following window. Enter ssh <youruserid>@delta.cs.uwindsor.ca
In the example below, Sanjay is my user ID.
 Enter your password.

Filezilla
The free FileZilla Client is available for Windows, macOS and Linux.
Download
|
||
|
Using FileZilla
SFTP
Using the Quickconnect feature

Use these settings:
- Set Host to an FQDN, for example delta.cs.uwindsor.ca or (electron.cs.uwindsor.ca)
- Set Username to your UWinID (all in lowercase characters)
- Set Password to your campus password
- Set Port to 22 (this is required if the host URL does not include the protocol prefix!)
Press the Quickconnect button to open a new SFTP file transfer session.
Configuring a connection using the Site Manager

Open the Site Manager from the File menu.
Use these settings in the General tab:
- Set Protocol to SFTP - SSH File Transfer Protocol
- Set Host to an FQDN, for example myweb.cs.uwindsor.ca
- Set Username to your UWinID (all in lowercase characters)
- Set Password to your campus password
Use this setting in the Transfer Settings tab:
- Check Limit number of simultaneous connections
- You can set the Maximum number of connections to between 1 and 5. If this number is too high, the server may blacklist your IP for attempting to open too many sessions simultaneously.
Technical Resources Available
The School of Computer Science operates a modern, full-service data-center and computing facility for use by students, faculty, and staff. This facility provides:
- Linux desktop environments are providing remote and terminal-based access.
- Network-attached file storage.
- Network infrastructure consisting of wireless, copper and fiber connections independently switched.
- Virtual servers, domain hosting services (the MyWeb system).
- Specialized servers including Team Foundation Server, Oracle databases and Oracle Application Server.
- Microsoft Windows support.
- Computer science private cloud storage, and archival.
- Digital Media and video conferencing facilities based on open-source software.
Most users will access CS resources through the Linux desktops, or from their PC or tablets using our (cswifi) wireless network.
Azure Education
Microsoft Software Downloads
|
|

|
The university subscribes to Microsoft Azure Education Dev Tools for Teaching providing access to a wide range of Microsoft development, productivity tools, and operating systems, such as:
- SQL Server
- Visual Studio Enterprise
- Machine Learning Server
- MS Project Professional
- SharePoint Server
- Windows 10
- Windows 11
- Windows Server
- Visio Professional
- and many others ...

Digital Research Alliance of Canada
The Digital Research Alliance of Canada serves Canadian researchers, with the objective of advancing Canada’s position as a leader in the knowledge economy on the international stage. By integrating, championing and funding the infrastructure and activities required for advanced research computing (ARC), research data management (RDM) and research software (RS), we provide the platform for the research community to access tools and services faster than ever before.
To access SHARCNET / Alliance resources, you first need a CCDB account. Confirm with your supervisor whether they have an active CCDB account. Afterward, you'll need to create your own CCDB account, listing your supervisor as the PI. To do this:
- Visit this page: Apply for an account.
- Go to https://ccdb.alliancecan.ca/.
- Click "Register."
- Complete the form, agree to the policies, and click "Submit."
- Fill out the next page.
Make sure to select the correct "Position" (e.g., Master's Student).
You will need your supervisor’s CCRI number to complete this section. Ask your supervisor for their CCDB CCRI number (they can find it by logging in to https://ccdb.alliancecan.ca/). - Once finished, click "Submit application."
-
Next steps: Your supervisor will receive an email to approve or disapprove your application.
Once approved, you’ll be able to log in and access the clusters.
|
For further information or assistance, please contact:
Paul Preney, OCT, M.Sc., B.Ed., B.Sc. |
Wireless
CS and UW wireless service
cswifi
Computer Science wifi "cswifi" is available in the following buildings
- Lambton Tower
- Erie
- Windsor Hall
- 300 Ouellete
Linux OS, after clicking on the cswifi SSID

View and Accept the certificate.
- if your username & password doesn't work, please sync your password from https://auth.cs.uwindsor.ca
- For help, please contact CS IT at accounts@cs.uwindsor.ca
Eduroam
Please visit the following link for eduroam access.
Which wireless network should I use?
Connecting Computers and Mobile Devices to University of Windsor Wi-Fi
What is EDUROAM?
EDUROAM (education roaming) is an international Internet access roaming service for users in research, higher education, and further education.
MyWeb Tutorials
MyWeb Tutorials: Login to MyWeb
DirectAdmin is a web-based hosting control panel that allows you to manage your website files, databases, and basic site settings through a browser.
At the School of Computer Science, we use DirectAdmin under the name MyWeb to provide students with personal web hosting space.
-
Login to MyWeb using your UWINID and password:
https://www.myweb.cs.uwindsor.ca

-
If You cannot Log In
You must activate or re-sync your password using the CS authentication portal:


MyWeb Tutorials: File Manager & HTML page
In this tutorial, we will create a simple HTML page and navigate through the website's files.
Accessing the File Manager
- Log in to MyWeb (DirectAdmin)
- From the main dashboard, click File Manager

- You will see a directory tree showing files and folders associated with your account


Understanding the File Structure
Your account contains several folders. The most important ones are:
📁 public_html (Most Important)
- This is the web root
- Any file placed here is accessible through your website
- Example:
- public_html/index.html → https://yourusername.myweb.cs.uwindsor.ca
This is where your website files go
📁 public_ftp
- Used for FTP access
- Typically not used unless you connect using an FTP client
- Does not automatically publish files to the web
📁 Other folders you may see
- logs – Website access/error logs
- domains – Used when multiple domains/subdomains exist
- System folders – Should not be modified
Do not delete folders unless instructed
Creating or Uploading Files
Inside public_html, you can:
- Upload files (HTML, PHP, images, CSS, JS)
- Create new files
- Create subfolders (e.g., images, css, js)
Example structure:
public_html/
├── index.html
├── about.html
├── css/
│ └── style.css
├── images/
│ └── logo.pngWebsite Entry (Starting) Files
When someone visits your website, the web server looks for default index files.
Common starting files:
- index.html
- index.php
If both index.html and index.php exist, index.html will win and load first
When to Use HTML vs PHP
Use HTML (.html) when:
- Your site is static
- No database or server logic is needed
- You are learning basic web structure
Use PHP (.php) when:
- You need server-side logic
- You connect to a database
- You process forms or user input
Quick Tips & Common Mistakes
✔ Always place website files in public_html
✔ File names are case-sensitive (Index.html ≠ index.html)
✔ One index file per folder is enough
❌ Don’t delete system folders
❌ Don’t expect files outside public_html to be public
Create Your first HTML page
- From "File Manager", go to "public_html"
- Optional: backup your current index.html file (rename it to index.html-backup)

- Create a new file index.html

- Right-click on the newly created index.html file and select "Edit"

- In the new page, place your code, or optionally, copy the following code:
<!DOCTYPE html> <html lang="en"> <head> <meta charset="UTF-8"> <meta name="viewport" content="width=device-width, initial-scale=1.0"> <title>Your Name - Personal Site</title> <!-- You can add CSS styling here or link an external CSS file --> <style> body { font-family: sans-serif; margin: 40px; line-height: 1.6; } h1 { color: #333; } p { color: #666; } </style> </head> <body> <h1>Hello, I'm [Your Name]</h1> <p>Welcome to my personal website!</p> <p>I am a student at School of Computer Science at the University of Windsor, and you can learn more about me on this page.</p> <h2>Interests</h2> <ul> <li>Coding</li> <li>Design</li> <li>[Your Other Interest]</li> </ul> <h2>Contact</h2> <p>You can reach me via email at [your email address].</p> </body> </html> - Then "Save" the page and your refresh your website at https://yourusername.myweb.cs.uwindsor.ca


Congratulations! You created your first website :)
MyWeb Tutorials: Database Creation
This article provides step-by-step instructions for creating a database in MyWeb (DirectAdmin) and a table in phpMyAdmin.
- Login to MyWeb using your UWINID and password:
https://www.myweb.cs.uwindsor.ca - From “Account Manager” menu, click on “Databases”

- In the “Create Database” section, click on “Advanced mode”

Fill in:
a. Database Name (example: projectdb)
b. User name (can be the same as DB name)
c. Password (generate or enter your own)

- After creation, you will get a confirmation like the following (record these info)

- To access the Database, you can use phpMyAdmin, you can access it either from the same page where you created the Database (top right)

or you can access phpMyAdmin from the left menu:

In the phpMyAdmin page, click on your newly created Database

- You can create a table either using the “Create new table” wizard

Then define your fields/columns (as shown in the image below as an example)

Or you can create it using SQL command (the recommended method):

Please refer to the following sites for additional information about SQL:
· https://www.datacamp.com/tutorial/my-sql-tutorial
· https://www.w3schools.com/MySQL
· https://www.mysqltutorial.org
MyWeb Tutorials: Create PHP/DB application
This tutorial shows how to:
- Create a PHP file
- Connect to a database
- Display table contents
- Add Create, Read, Update, Delete (CRUD) functionality
Create a PHP File
- Log in to MyWeb (DirectAdmin)
- Open File Manager
- Go to:
- public_html
- Create a new file called:
- people.php
- Edit the file
Database Table Used
We assume the following table already exists: (refer to this tutorial in case you dont have this table)
Persons
--------------------------------
PersonID INT (Primary Key)
LastName VARCHAR(255)
FirstName VARCHAR(255)
Address VARCHAR(255)
City VARCHAR(255)
Database Connection
At the top of people.php, add:
<?php
$host = "localhost";
$db = "testproj1_myDB";
$user = "testproj1_myDB";
$pass = "myPassword";
$conn = new mysqli($host, $user, $pass, $db);
if ($conn->connect_error) {
die("Connection failed: " . $conn->connect_error);
}
?>
Replace the database credentials with your own.
Display Table Contents (READ)
Add this below the connection code:
<h2>People List</h2>
<table border="1" cellpadding="5">
<tr>
<th>ID</th>
<th>First Name</th>
<th>Last Name</th>
<th>Address</th>
<th>City</th>
<th>Actions</th>
</tr>
<?php
$result = $conn->query("SELECT * FROM Persons");
while ($row = $result->fetch_assoc()) {
echo "<tr>";
echo "<td>{$row['PersonID']}</td>";
echo "<td>{$row['FirstName']}</td>";
echo "<td>{$row['LastName']}</td>";
echo "<td>{$row['Address']}</td>";
echo "<td>{$row['City']}</td>";
echo "<td>
<form method='post' style='display:inline;'>
<input type='hidden' name='delete_id' value='{$row['PersonID']}'>
<input type='submit' value='Delete'
onclick=\"return confirm('Delete this record?');\">
</form>
</td>";
echo "</tr>";
}
?>
</table>
Add New Records (CREATE)
Add this above the table:
<form method="post">
<label>Person ID:</label><br>
<input type="number" name="personid" required><br><br>
<label>First Name:</label><br>
<input type="text" name="firstname" required><br><br>
<label>Last Name:</label><br>
<input type="text" name="lastname" required><br><br>
<label>Address:</label><br>
<input type="text" name="address"><br><br>
<label>City:</label><br>
<input type="text" name="city"><br><br>
<input type="submit" name="add" value="Add Person">
</form>Then add this PHP logic near the top of the file:
if (isset($_POST['add'])) {
$stmt = $conn->prepare(
"INSERT INTO Persons (PersonID, FirstName, LastName, Address, City)
VALUES (?, ?, ?, ?, ?)"
);
$stmt->bind_param(
"issss",
$_POST['personid'],
$_POST['firstname'],
$_POST['lastname'],
$_POST['address'],
$_POST['city']
);
$stmt->execute();
$stmt->close();
header("Location: people.php");
exit;
}Delete Records (DELETE)
Add this near the top:
if (isset($_POST['delete_id'])) {
$id = (int) $_POST['delete_id'];
$stmt = $conn->prepare("DELETE FROM Persons WHERE PersonID = ?");
$stmt->bind_param("i", $id);
$stmt->execute();
$stmt->close();
header("Location: people.php");
exit;
}Now clicking Delete removes a record.
Full people.php file
<?php
/**
* Simple PHP CRUD Example
* Table: Persons
*
* Columns:
* - PersonID (INT, Primary Key, Auto Increment)
* - FirstName (VARCHAR)
* - LastName (VARCHAR)
* - Address (VARCHAR)
* - City (VARCHAR)
*/
/* ===============================
Database Configuration
=============================== */
$host = "localhost";
$db = "testproj1_myDB";
$user = "testproj1_myDB";
$pass = "myPassword";
/* ===============================
Database Connection
=============================== */
$conn = new mysqli($host, $user, $pass, $db);
if ($conn->connect_error) {
die("Database connection failed: " . $conn->connect_error);
}
/* ===============================
CREATE (Add New Record)
=============================== */
if (isset($_POST['add'])) {
$stmt = $conn->prepare(
"INSERT INTO Persons (PersonID, FirstName, LastName, Address, City)
VALUES (?, ?, ?, ?, ?)"
);
$stmt->bind_param(
"issss",
$_POST['personid'],
$_POST['firstname'],
$_POST['lastname'],
$_POST['address'],
$_POST['city']
);
$stmt->execute();
$stmt->close();
header("Location: people.php");
exit;
}
/* ===============================
DELETE (Remove Record)
=============================== */
if (isset($_POST['delete_id'])) {
$id = (int) $_POST['delete_id'];
$stmt = $conn->prepare("DELETE FROM Persons WHERE PersonID = ?");
$stmt->bind_param("i", $id);
$stmt->execute();
$stmt->close();
header("Location: people.php");
exit;
}
?>
<!DOCTYPE html>
<html>
<head>
<meta charset="UTF-8">
<title>People CRUD Example</title>
</head>
<body>
<h1>People Database</h1>
<!-- ===============================
CREATE FORM
=============================== -->
<h2>Add New Person</h2>
<form method="post">
<label>Person ID:</label><br>
<input type="number" name="personid" required><br><br>
<label>First Name:</label><br>
<input type="text" name="firstname" required><br><br>
<label>Last Name:</label><br>
<input type="text" name="lastname" required><br><br>
<label>Address:</label><br>
<input type="text" name="address"><br><br>
<label>City:</label><br>
<input type="text" name="city"><br><br>
<input type="submit" name="add" value="Add Person">
</form>
<hr>
<!-- ===============================
READ (Display Records)
=============================== -->
<h2>People List</h2>
<table border="1" cellpadding="6" cellspacing="0">
<tr>
<th>ID</th>
<th>First Name</th>
<th>Last Name</th>
<th>Address</th>
<th>City</th>
<th>Action</th>
</tr>
<?php
$result = $conn->query("SELECT * FROM Persons");
while ($row = $result->fetch_assoc()) {
echo "<tr>";
echo "<td>{$row['PersonID']}</td>";
echo "<td>{$row['FirstName']}</td>";
echo "<td>{$row['LastName']}</td>";
echo "<td>{$row['Address']}</td>";
echo "<td>{$row['City']}</td>";
echo "<td>
<form method='post' style='display:inline;'>
<input type='hidden' name='delete_id' value='{$row['PersonID']}'>
<input type='submit' value='Delete'
onclick=\"return confirm('Delete this record?');\">
</form>
</td>";
echo "</tr>";
}
?>
</table>
</body>
</html>
File Location Reminder
File must be in:
public_html/people.php
Access it via:
https://yourname.myweb.cs.uwindsor.ca/people.php
Errors and Logs
During building of your PHP application, you may need to view the errors either on the webpage or via the log.
To view errors on your PHP page, add the following at the top of your PHP file:
ini_set('display_errors', 1);
ini_set('display_startup_errors', 1);
error_reporting(E_ALL);Put them before any other PHP code.
Once fixed, remove the debug lines.
Or you can access the log file from "Site Summary/Statistics/Logs"


Summary
- PHP files go in public_html
- Use PHP + MySQLi to access databases
- CRUD means:
- Create – Insert records
- Read – Display records
- Update – Modify records
- Delete – Remove records
MyWeb Tutorials: Git (Version Control)
Recommended Workflow (Read First)
If you are planning to use GIT, then you need to consider our GitLab server is the source of truth for your website code. You should write and edit your code locally on your own computer using any editor or IDE (such as VS Code). Your local project must be connected to gitlab.cs.uwindsor.ca, where you commit and push your changes. Once your code is pushed to GitLab, you then log in to MyWeb (DirectAdmin) and use Fetch followed by Deploy to publish the latest version of your code to the web server. Do not edit files directly in MyWeb using File Manager or FTP after Git is enabled, as those changes will be overwritten on the next deploy.
Summary of Workflow:
- Edit locally on your computer
- Commit & push to GitLab
- Fetch & Deploy to MyWeb
First-Time Setup (Do Once)
- Create an SSH key on the student’s local computer
- Add the local SSH key to GitLab (gitlab.cs.uwindsor.ca)
- Configure your IDE (e.g., VS Code) to use GitLab
- Create a new project on GitLab and copy the SSH remote URL
- Initialize the local project and connect it to the GitLab repository
- If code already exists on MyWeb, import it into the local project
- Commit and push the initial codebase to GitLab
- Create a separate SSH key in MyWeb (DirectAdmin) for deployment
- Add the MyWeb public SSH key to GitLab
- Initialize and connect the Git repository in MyWeb
- Perform the first Fetch and Deploy from GitLab to MyWeb
Daily / Ongoing Workflow
- Edit code locally on the student’s computer
- Commit and push changes to GitLab
- Log in to MyWeb (DirectAdmin)
- Fetch updates from GitLab
- Deploy the latest code to the website
1. Create an SSH key on the student’s local computer
- SSH keys are used to connect your computer to GitLab securely
- If you already have an SSH key, you may reuse it
- For simplicity and clarity, it is recommended to create a new SSH key specifically for GitLab
Windows (Windows Terminal / PowerShell / Git Bash)
- Open Windows Terminal, PowerShell, or Git Bash
- Generate a new SSH key:
ssh-keygen -t ed25519 -C "yourusername@gitlab.cs.uwindsor.ca"
- When prompted:
- File location: press Enter to accept default
(or use gitlab_cs if you want a dedicated key) - Passphrase: optional (press Enter to skip)
- Start the SSH agent:
eval "$(ssh-agent -s)"
- Add the key to the agent:
ssh-add ~/.ssh/id_ed25519
(or the filename you chose)
macOS / Linux
- Open Terminal
- Generate a new SSH key:
ssh-keygen -t ed25519 -C "yourusername@gitlab.cs.uwindsor.ca"
- When prompted:
- File location: press Enter to accept default
- Passphrase: optional (press Enter to skip)
- Start the SSH agent:
eval "$(ssh-agent -s)"
- Add the key to the agent:
ssh-add ~/.ssh/id_ed25519
Verify the Key Was Created (All Systems)
- List SSH keys:
ls ~/.ssh
- You should see:
- id_ed25519
- id_ed25519.pub
Notes for Students:
- .pub file = public key (safe to share)
- non-.pub file = private key (never share)
- Public key will be added to GitLab in the next step
- You do not need to repeat this step unless you change computers
2. Add the SSH Key to GitLab (gitlab.cs.uwindsor.ca)
- Open GitLab in your browser:
- https://gitlab.cs.uwindsor.ca
- Log in with your CS credentials
- Open User Preferences
- Go to SSH Keys


Copy Your Public Key (from your computer)
- Display the public key:
cat ~/.ssh/id_ed25519.pub
(If you used a different filename, replace id_ed25519 accordingly.)
- Select and copy the entire output (starts with ssh-ed25519)
Add the Key in GitLab
- Paste the key into the Key field
- (Optional) Set a descriptive Title (e.g., Laptop – CS GitLab)
- Click Add key


Quick Verification (Optional but Recommended)
- Test the SSH connection:
ssh -T git@gitlab.cs.uwindsor.ca
- You should see a success message indicating authentication worked
Notes for Students
- You can add multiple SSH keys to the same GitLab account (one per device)
- This key is for your local computer only
- Do not upload private keys (id_ed25519)—only the .pub file
3. Configure Your IDE (VS Code) to Use GitLab
- Install Visual Studio Code if it is not already installed
- Ensure Git is installed on your system and available in your terminal
- Open VS Code
Verify Git Is Detected by VS Code
- Open the integrated terminal in VS Code:
- View → Terminal
- Check Git availability:
git --version
- If Git is detected, VS Code will automatically enable source control features
Configure VS Code to Use Your SSH Key
- Ensure the SSH agent is running (from earlier step)
- Confirm your SSH key is loaded:
ssh-add -l
- You should see your id_ed25519 (or chosen key name)
VS Code uses the system SSH configuration automatically—no extra setup is required if SSH works in the terminal.
(Optional but Recommended) Configure Git Identity
- Set your name and email (used in commits):
git config --global user.name "Your Full Name"
git config --global user.email "yourusername@uwindsor.ca"
(Optional) Test GitLab Access from VS Code
- From the VS Code terminal, test SSH:
ssh -T git@gitlab.cs.uwindsor.ca
- A success message confirms VS Code can authenticate with GitLab
Notes for Students
- VS Code does not store your SSH key; it uses the system SSH agent
- If Git works in the terminal, it will work in VS Code
- You only need to do this setup once per computer
4. Create a Project on GitLab and Get the SSH Remote URL
- Open GitLab in your browser:
- https://gitlab.cs.uwindsor.ca
- Log in with your CS credentials
- Click New Project
- Choose Create blank project


Project Setup
- Enter a Project name (e.g., myweb-project)
- Leave Visibility as default (Private)
- Click Create project
Get the SSH Remote URL
- After the project is created, open the project page
- Click Code (or Clone)
- Select SSH
- Copy the SSH URL, which looks like:
git@gitlab.cs.uwindsor.ca:yourusername/myweb-project.git

Notes for Students
- Always use the SSH URL, not HTTPS
- This URL will be used to connect:
- Your local project
- Your MyWeb deployment
- You only create the GitLab project once
5. Initialize the Local Project and Push Code to GitLab
This step connects your local code to the GitLab repository you just created.
If You Are Starting with New Code (No Existing MyWeb Files)
- Open a terminal inside your project folder
- Initialize Git:
git init
- Add the GitLab remote (use the SSH URL you copied):
git remote add origin git@gitlab.cs.uwindsor.ca:yourusername/myweb-project.git
- Add all files:
git add .
- Commit the initial version:
git commit -m "Initial commit"
- Push to GitLab:
git branch -M main
git push -u origin main
If Code Already Exists on MyWeb (Common Case)
- First, make sure your local project folder contains the files from MyWeb (public_html)
- Download them from MyWeb (zip or File Manager)
- Or copy them manually
- Then, inside that folder:
git init
git remote add origin git@gitlab.cs.uwindsor.ca:yourusername/myweb-project.git
git add .
git commit -m "Initial import from MyWeb"
git branch -M main
git push -u origin main
✔ GitLab now contains the full website code
✔ GitLab becomes the source of truth
Notes for Students
- This initialization happens once
- After this step:
- Do not treat MyWeb as the main copy
- All future changes start locally
6. Create a Deployment SSH Key in MyWeb (DirectAdmin)
This key is used only by MyWeb to fetch and deploy code from GitLab.
It is separate from the SSH key on your local computer.
- Log in to MyWeb (DirectAdmin)
- Go to Advanced features → SSH Keys
- Click Create Key


Fill in the fields
- Key ID: gitlab (or any short name)
- Authorize: ✔ checked
- Comment: yourusername@gitlab.cs.uwindsor.ca
- Key Size: 2048
- Password: leave empty
- Click Create

Copy the Public Key
- After creation, copy the public key (the .pub content)
- You will add this key to GitLab in the next step

To copy the public key, right click on *.pub file and open/edit it and copy the full content (to be used in step 7 below)
Notes for Students
- This key stays on the server
- Do not download or reuse it on your computer
- One MyWeb key can be reused for multiple repositories
7. Add the MyWeb SSH Key to GitLab
- Open GitLab in your browser:
- https://gitlab.cs.uwindsor.ca
- Log in with your CS credentials
- Go to User Preferences
- Select SSH Keys

Add the MyWeb Public Key
- Paste the public SSH key you copied from MyWeb
- Set a clear Title (e.g., MyWeb Deployment Key)
- Click Add key

Notes for Students
- This key is server-side only (deployment)
- It is different from your local computer’s SSH key
- GitLab allows multiple SSH keys per account
8. Initialize and Connect the Repository in MyWeb (DirectAdmin)
This step links MyWeb to your GitLab repository so it can deploy your code.
- Log in to MyWeb (DirectAdmin)
- Go to Advanced Features -> Git
- Click Create Repository


Fill in the Repository Details
- Domain: select your MyWeb domain (auto-filled)
- Name: any label (e.g., myweb-site)
- Remote: paste the SSH URL of your GitLab repository
- git@gitlab.cs.uwindsor.ca:yourusername/myweb-project.git
- Keyfile: select or enter the path to the private key created in MyWeb
- .ssh/gitlab (the exact file name you have in .ssh folder)
- Click Create Repository

What This Does
- Creates a local Git repository on MyWeb
- Links it to GitLab using SSH
- Prepares MyWeb for deployment (no files are changed yet)
Notes for Students
- Always use the SSH remote, not HTTPS
- Do not include full /home/... paths in the Keyfile field
- This setup is done once per project
9. Fetch and Deploy the Code to MyWeb
This step publishes your GitLab code to your MyWeb website.
Fetch From GitLab
- In MyWeb (DirectAdmin), go to Git
- Locate your repository
- Click the three dots (⋯) next to it
- Click Fetch

What Fetch does:
- Connects to GitLab
- Retrieves the latest commits and branch information
- Does not change your website files
Deploy to MyWeb
- Click the three dots (⋯) again
- Click Deploy
What Deploy does:
- Checks out the latest commit (usually from main)
- Copies files into:
- public_html/
- Makes the code live on your website
Verify Deployment
- Open File Manager
- Confirm files appear in public_html
- Visit your website in a browser:
- https://yourproject.myweb.cs.uwindsor.ca/
Important Notes for Students
- Always Fetch before Deploy
- Do not edit files in File Manager or via FTP after Git is enabled
- Manual changes will be overwritten on the next deploy
✅ Setup Complete
You have now:
- Connected your local computer to GitLab
- Connected MyWeb to GitLab
- Deployed your site using Git
Daily Workflow Reminder
- Edit code locally
- Commit and push to GitLab
- Fetch and Deploy from MyWeb
MyWeb Tutorials: Connect to DB remotely
In addition to accessing your database through phpMyAdmin on MyWeb, you may also connect to your database directly from your own computer using tools such as HeidiSQL, MySQL Workbench, DBeaver, or the MySQL command-line client. Remote database access allows you to manage tables, run queries, and test your applications more easily while developing locally. In this guide, you will learn how to enable remote access to your database on MyWeb (DirectAdmin) and how to configure your database client to connect securely to the server.
- Login to https://myweb.cs.uwindsor.ca with your username and password
- From "Account Manager" -> Databases. Select or create the database you want to connect to:

-
Click on “Manage”

- Select the user you want to connect with, and click on “Manage”

-
Scroll down to “Allowed Hosts” and add % in the “Allow access from” and click on “Add Host”

Note: % means any host
-
That’s it.
-
Now you can test connecting to the database from your computer (after connecting to VPN).
Example:Host: myweb.cs.uwindsor.ca Port: 3306 Database: testproj1_myDB Username: testproj1_myDB Password: <DB password>


You can use any client to connect and manage the database from your computer. I recommend HeidiSQL https://www.heidisql.com/download.php

How To
MyWeb
Troubleshooting
IP blacklisting
When you try to connect to your myweb.cs.uwindsor.ca management console, you are told your IP has been blacklisted. This is caused by too many failed login attempts within a short period.
To remove your IP from the blacklist, please use the CS Password Utility.
See Passwords#Additional_non-password_related_functions.
I can't login to phpMyAdmin
You must first create a database using MySQL Management in the DirectAdmin web control panel.

About Hosting
The School of Computer Science offers all faculty, staff, and students (majors or those taking key courses) a virtual hosting environment for Web and Email. Domains created automatically through the CS Password Utility have the name userid.myweb.cs.uwindsor.ca, where userid is your UWinID.
The myWeb server is separate from the general desktop servers like Delta. You cannot access your Web files through a secure shell terminal (ssh) connection. Instead, access the files using a file transfer client as described.
You can create a new domain and access the DirectAdmin Control Panel to manage your domain (and sub-domains) by visiting the CS Password Utility. The DirectAdmin control panel can be accessed at https://www.myweb.cs.uwindsor.ca:2222/evo
Note: if you cannot access the DirectAdmin login page, please try another browser or from Incognito/private mode (check this article for help)
Basic DirectAdmin Tour
DirectAdmin is a Web-based control panel that will allow you to manage your Web site(s), email addresses, MySQL databases, and Web applications. You can also manage your files stored on the myweb.cs.uwindsor.ca server with file transfer programs, such as FileZilla, and edit your files using editors that support SFTP, such as Notepad++ and BBEdit. Separate videos are provided for that.
Multiple Domains
The myWeb server, through the DirectAdmin control panel, allows you to create e-mail addresses in your sub-domains or additional domains. Addresses can be full e-mail mailboxes or forwarded to other mailboxes.
You can access these extra mailboxes using mail clients or the Roundcube Web-based mail program. The only differences are that you need to use the e-mail addresses as the username when connecting, and cloud-based calendars and address books are unavailable. You can create a new mailbox under a domain that you control using DirectAdmin, and learn how to connect to it using Roundcube.
Creating FTP accounts
You can create highly customizable FTP accounts to allow other users access to specific parts of your domain. The password for the account can be reset at any time by the owner of the domain or by the user. Once the account has been created and the user is given a password, the user can change the password to something they prefer.
File Access
Notepad++
Notepad++ can easily access files stored on the myWeb server from your PC. Editing remote files is as easy as editing local ones on your PC.
BBEdit
BBEdit is a fantastic text editor for macOS that is available for free through the App Store. For those of you who are familiar with it, TextWrangler is now BBEdit.
BBEdit interfaces with files on the myWeb server with just a couple of clicks.
Accessing files from a Linux desktop
It is easy to access your myWeb files from Linux desktops. The best way is to create a bookmark in your Places that will link to your domain's folder on the myWeb server.
Follow these steps:
- From Places, open your Home Folder
- In Location, enter sftp://myweb.cs.uwindsor.ca/domains, and press Enter
- Enter your userid and password to establish the connection.
Once the connection is made, you will see the contents of your myWeb domains folder. Your Web files are in sub-folders named public_html for the corresponding domain.
You can add a bookmark so that this connection is made every time you login to the Linux desktop.


NoMachine
The School of Computer Science runs NoMachine Terminal Server.
The client connects to a server named delta.cs.uwindsor.ca.
Remote desktop via a Web Browser
Since the School of Computer Science has a NoMachine Enterprise license, the delta.cs.uwindsor.ca remote desktop can be accessed directly from the browser through the link provided!
NX (using the NoMachine Enterprise Client)
Using the NX protocol (not SSH)
You can download NoMachine Enterprise Client from here.

Edit a connection to use the NX protocol
You should use the NX protocol, but only if you are connected to the VPN!
Edit and save the connection to modify the protocol it uses.
Troubleshooting
Application Menu is missing

Run this command from a terminal window (right-click the background and choose Open in terminal):
mate-panel --replace &
The ampersand is required to run the command in the background, independently of the terminal process from which you ran it.
Notepad++
Download
|
Download for Windows |
The latest version will be at the top of the list. Select it to save and run the appropriate Installer.
Using Notepad++
SFTP
You will need to install the NppFTP Plugin for Notepad++ to use this protocol.
SQL*plus ( to Oracle)
How to use from delta.cs.uwindsor.ca

Troubleshooting
Login problems
Oracle database user accounts and passwords are created, synchronized, or unlocked from the CS Password Utility.
Make sure you are using your UWinID as your <user-name>, all lowercase without @uwindsor.ca appended.
|
|
If your password does not meet the following restrictions, you MUST enclose your password in double quotation marks when prompted.
|
The password restrictions for Oracle account passwords are as follows:
- Passwords cannot contain quotation marks.
- Passwords are case sensitive.
- A password must begin with an alphabetic character.
- Passwords can contain only alphanumeric characters and the underscore (_), dollar sign ($), and pound sign (#).
- Password may NOT contain the @ character.
- Oracle strongly discourages you from using $ and #.
Common Errors
ERROR: ORA-01017: invalid username/password; logon denied
Your password meets the character requirements, but you typed in the wrong password.
Synchronize your password again using the CS Password Utiliity.
ERROR: ORA-12532: TNS:invalid argument
Your password contains characters, probably @, that require you to enclose it within double quotation marks.
Running sqlplus from your machine at home
Install Oracle client. Use Global Protect VPN and sign in to campus.
Just type sqlplus at a terminal window prompt.
It uses the following tnsnames.ora to establish the connection with the CS01 instance on oracle.cs.uwindsor.ca:
CS01 =
(DESCRIPTION =
(ADDRESS = (PROTOCOL = TCP)(HOST = oracle.cs.uwindsor.ca)(PORT = 1521))
(CONNECT_DATA =
(SERVER = DEDICATED)
(SID = cs01)
)
)
Oracle Using Java and Python from Delta
Connecting to Oracle server from Delta using jdbc
JDBC Connection string
In the connection strings below, replace "userid" with your UWinID, and "password" with your campus password.
Code to test your connection:
import java.sql.*;
import oracle.jdbc.*;
import oracle.jdbc.pool.OracleDataSource;
class JDBCVersion
{
public static void main (String args[]) throws SQLException
{
OracleDataSource ods = new OracleDataSource();
ods.setURL("jdbc:oracle:thin:userid/password@oracle.cs.uwindsor.ca:1521:cs01");
Connection conn = ods.getConnection();
// Create Oracle DatabaseMetaData object
DatabaseMetaData meta = conn.getMetaData();
// gets driver info:
System.out.println("JDBC driver version is " + meta.getDriverVersion());
}
}
The classpath for the Oracle JDBC archive will vary depending on the operating system and which version of the Oracle client you installed. The classpath in the following commands are those required to compile and run from a terminal on cs.uwindsor.ca.
javac -classpath /usr/lib/oracle/12.1/client64/lib/ojdbc7.jar JDBCVersion.java java -classpath /usr/lib/oracle/12.1/client64/lib/ojdbc7.jar:. JDBCVersion
Connecting to Oracle server from Delta using Python
- Create a Python Virtual Environment
- mkdir oraclepy
- cd oraclepy/
- python -m venv ./venv
- Pip install cx_oracle
- pip install cx_oracle --upgrade

- pip install cx_oracle --upgrade
- Use the following code db_config.py
import cx_Oracle import sys import os import getpass user = os.getlogin() dsn = os.environ.get("PYTHON_CONNECT_STRING", "oracle.cs.uwindsor.ca/cs01") pw = os.environ.get("PYTHON_PASSWORD") if pw is None: pw = getpass.getpass("Enter password for %s: " % user) - Using the following code, you connect to the database
import cx_Oracle import db_config con = cx_Oracle.connect(db_config.user, db_config.pw, db_config.dsn) print("Database version:", con.version) - Run the Code: before running the code, set the environment variables using export

- Check the following URL for more information: Tutorial cx_Oracle
- You can embed the export variables in shell script and call your Python code from the same script
export ORACLE_HOME=/opt/oracle/instantclient_21_8 export LD_LIBRARY_PATH=/opt/oracle/instantclient_21_8:$PATH export TNS_ADMIN=/opt/oracle/instantclient_21_8/network/admin/ - To exit the Python virtual env, type deactivate and press enter. you will be back at the Linux prompt


WSL
Windows Subsystem for Linux
The Windows Subsystem for Linux (WSL) was introduced by Microsoft to Windows 10. WSL allows users to to run a full Linux user space in Windows. The latest version, WSL 2, is a major upgrade and introduces a Microsoft-written Linux kernel that is delivered by Windows Update instead of being bundled with the Windows OS image.
This guide will show you how to create a working Mate Desktop environment on Debian Buster, similar to our CS Linux Desktop servers available through NoMachine. This will help you learn much more about using and maintaining a Linux environment.
Installing WSL
Windows Subsystem for Linux Installation Guide
X11 forwarding
You can use Mobaxterm to access WSL with X11 enabled.

Or your will need to install an X server to run a graphical Linux environment in WSL.
|
Download VcXsrv for Windows |
Notes:
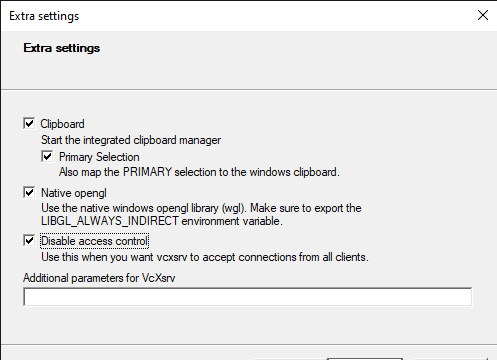
- When installing VcXsrv, Make sure to "Disable access control"

-
add the following to your
~/.bashrc:export DISPLAY=$(ip route list default | awk '{print $3}'):0 export LIBGL_ALWAYS_INDIRECT=1 - Add a separate inbound rule for TCP port 6000 to the windows firewall in order to allow WSL access to the X server, as described by the wsl-windows-toolbar-launcher.
Debian
Microsoft provides an app to install a complete Debian command line environment.
 |
Get Debian for WSL |
JetBrains
Free educational license for all the JetBrains IDEs for Students and Faculty.
It is a JetBrains initiative, neither the University of Windsor nor the Department of Computer Science have any contractual obligations with JetBrains.
As individual license owners, the students/faculty using the license are responsible for JetBrains' contractual obligations.
You have to renew the license every year.
Please visit the following link for more information.
https://www.jetbrains.com/community/education/#students
https://www.jetbrains.com/products/
For C#
Use Rider IDE it is cross platform solution for .Net development.
https://www.jetbrains.com/rider/features/
Gitlab
We have a community edition (Gitlab CE) instance running at https://gitlab.cs.uwindsor.ca
What is GitLab?
GitLab is a web-based Git repository that provides free open and private repositories, issue-following capabilities, and wikis. It is a complete DevOps platform that enables professionals to perform all the tasks in a project—from project planning and source code management to monitoring and security. Additionally, it allows teams to collaborate and build better software.
GitLab helps teams reduce product lifecycles and increase productivity, which in turn creates value for customers. The application doesn't require users to manage authorizations for each tool. If permissions are set once, then everyone in the organization has access to every component.
VS Code
Installed on delta.cs.uwindsor.ca. It will work from home using NoMachine or from any labs. you can install extensions under your own user account.
How to use please look at the picture below.

From Windows or Mac
- Launch VS Code and click on the "Open Remote Window" icon from the lower left corner.

- Click on "Connect to Host"

- Choose "Add New SSH Host"

- type your username and hostname as username@hostname. (e.g: azakaria@delta.cs.uwindsor.ca)

- Select which file you want to use to save the new added hostname (hit enter)

- Click on "Connect"

- Choose "Linux"

- Type in your password

- Click on "Open Folder"

- Click on "OK"

- It may ask you again to select the platform type (Linux) and type in the password
- Trust the authors


How to Set Dynamic (DHCP) IP Address - Windows 10/11
1. Access the Control Panel
- Windows 11: In the Windows search bar, type in “ncpa.cpl” and then press enter.

- Windows 10:
- On your keyboard, press the “Windows” and “R” keys at the same time.
- Enter “ncpa.cpl” in the window that pops up.

2. Select the network adapter
Right click on the network adapter that is currently connected to the device that you are trying to configure. Usually, it will be the adapter with the word “Ethernet” in the name.

3. Select Properties
Select “Properties” from the drop-down menu.

4. Select Internet Protocol Version 4 (TCP/IPv4)
Double-click on “Internet Protocol Version 4 (TCP/IPv4)”.

5. Change settings option to DHCP
When you get to the “Internet Protocol Version 4 (TCP/IPv4) Properties” window, click “Obtain an IP address automatically”. This will allow your PC to be assigned a random IP address on your network.

More Info:
How to Set Dynamic (DHCP) IP Address - Mac OS
1. Open System Preferences
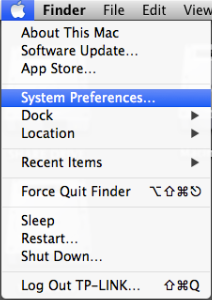
Click the Apple icon, from the Apple drop-down list, select System Preferences.
2. Open Network Settings
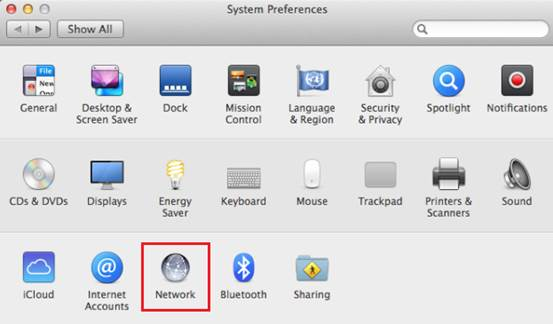
Click the Network icon.
3. Select Your Wired Network Interface (Ethernet)
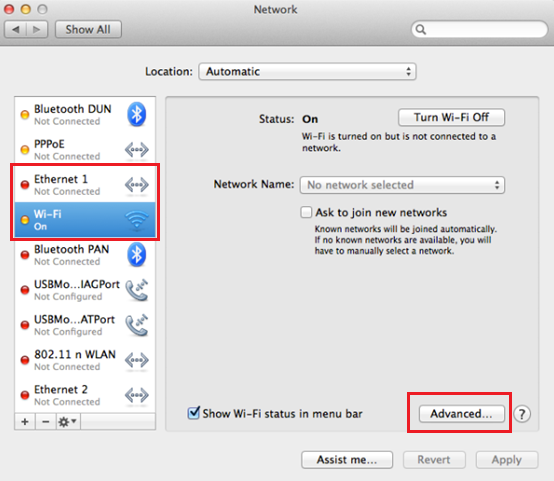
In the left column, select Ethernet (for wired connection) or Wi-Fi(for wireless connection), then Click the Advanced.
Note: in this article we want to change the wired connection, therefore, click on Ethernet
4. Select TCP/IP Protocol
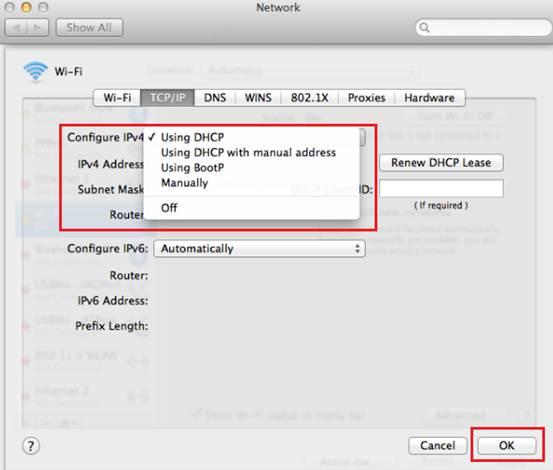
Click TCP/IP.

5. Configure IPv4
From the Configure IPv4 drop-down list, select Using DHCP, then click the OK button.
More Info:
Connecting to the ‘delta.cs.uwindsor.ca’ Server via SSH through Visual Studio Code
This article was contributed by Avinash Karhana (karhanaa@uwindsor.ca). Thank you!
Prerequisites
- **Visual Studio Code (VS Code)** installed. If you don't have it, download and install it from https://code.visualstudio.com.
- **Remote - SSH Extension** for VS Code installed.
- You can install it from the Extensions view in VS Code or from https://marketplace.visualstudio.com/items?itemName=ms-vscode-remote.remote-ssh.
- Or can search in extensions by typing `Remote Development` in the Extensions view in VS Code.

- You can install it from the Extensions view in VS Code or from https://marketplace.visualstudio.com/items?itemName=ms-vscode-remote.remote-ssh.
- **SSH Client** installed on your local machine:
- Windows**: Install Git for Windows which comes with Git Bash. You can download it from https://gitforwindows.org.
- **MacOS**: SSH client is pre-installed.
- **Linux**: SSH client is pre-installed.
Step-by-Step Guide
- Install the Remote - SSH Extension in VS Code
- Open VS Code.
- Go to the Extensions view by clicking the Extensions icon in the Activity Bar on the side of the window.
- Search for "Remote Development" and install the extensions by Microsoft (As given in previous section).
- Add the SSH Host
-
Open the Remote Explorer tab
-
In the Remote Explorer tab, click the `+` button next to `SSH Targets`.

- In the input dialog that appears, enter:
ssh uwinid@delta.cs.uwindsor.ca
Replace `uwinid` with your actual username, then hit `Enter`.-
-
-
- If you are connecting to a different server, replace the server in the example above with the current server name, which is delta.cs.uwindsor.ca ( it can be gamma.cs.uwindsor.ca ...)
-
-
-
- Choose whether to save the configuration in the `~/.ssh/config` file or just for this session.
-
- Connect to the Server via VS Code
- In the Remote Explorer tab, under `SSH Targets`, you should now see `delta.cs.uwindsor.ca`.
- Click on `delta.cs.uwindsor.ca` to connect.

- A new VS Code window will open. When prompted, enter your password for the `delta.cs.uwindsor.ca` server.

- In the Remote Explorer tab, under `SSH Targets`, you should now see `delta.cs.uwindsor.ca`.
- Open a Remote Workspace
- Once connected, you can open a folder on the remote server by clicking on `Open Folder` in the Remote Explorer sidebar.

- Navigate to the desired directory on the server and open it.

- If prompted for your password again, enter it to proceed.
- Once connected, you can open a folder on the remote server by clicking on `Open Folder` in the Remote Explorer sidebar.
Tips and Troubleshooting
- If you face issues with the host not being live or timeout, make sure you are either on CS Network WiFi/Ethernet or connected via Global Protect VPN.
- If you encounter connection issues, check the SSH output log in VS Code by clicking on the `View` menu, then `Output`, and selecting `Remote - SSH` from the dropdown.
- Ensure that your user account on the `delta.cs.uwindsor.ca` server is set up to accept SSH connections.
- If you are having connection issues due to invalid credentials, try authenticating them by going to https://auth.cs.uwindsor.ca; this will sync your credentials across all the CS services.
- In case you do not want to enter the password every time you connect to SSH, follow the other guide that helps you to set Key based authentication for SSH.
Check and clean up large files in your home directory
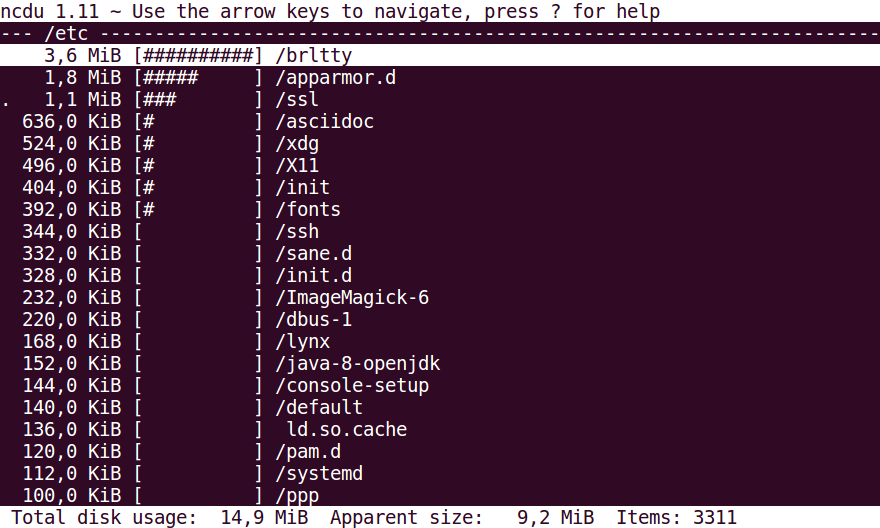
Over time, your home directory may grow in size. We recommend regularly checking your disk usage and removing any unnecessary files or folders.
You can use one of the following methods to check your disk space usage:
- Use du command:
du -cha --max-depth=1 . | grep -E "G" - Use ncdu command:
ncdu
To exit, press on letter x

Graduate Printer
- Note: Printing is only available when connected to CSWIFI or when using the computers located in the Graduate Labs (Erie).
- First, delete the old “GradPrinter” from your computer (if exists)

- Install PaperCut Print Deploy Client:
- Login with your UWINID and password (use your username only)

- If you cannot log in, sync your password using the CS password manager utility at https://auth.cs.uwindsor.ca
- If you have difficulty, please contact us by email at accounts@cs.uwindsor.ca.
-
 IMPORTANT:
Please note that this printer is provided as a free service for all graduate students. We kindly ask that you use it responsibly — personal printing is not permitted.
Misuse of this service may result in your account being disabled. - To view your balance or print from the web (without installing the printer's driver), please log in to https://print.cs.uwindsor.ca:9192


Troubleshooting:
- If you get a "Failed" message on your computer after you install the PaperCut Deploy client, then add your username and password to the "network password":
- Open "Manage Network Password"
- Click on "Add a Windows credentials"
- Add the following:
IMPORTANT: add CS\ in front of your username as shown in the image below.

- Save it, then open your PaperCut Print Deploy Client and click on "Refresh"

PostgreSQL
Note: Access to PostgreSQL is restricted to students with projects, and it can be accessed via special subnet (not available publicly to all students)
How to Access Your Database:
- First step, you need to request the creation of a database by sending an email to accounts@cs.uwindsor.ca
- Provide details about your project, supervisor, and what is the suggested name of the database and include a list of all students (if applicable).
- Once CS IT confirms the DB creation, you can log in to https://psql.cs.uwindsor.ca

- If it’s your first time, click on “Add New Server”

- In the (Register - Server) Windows:
- Name: localhost
- Hostname/address: localhost
- Maintenance database: Your DB name
- Username: your UWINID
- Password: your UWIN password
- Click on "Save"


Connect to PostgreSQL from console:
- Login/SSH to your project’s VM, then issue this command:
psql -h psql.cs.uwindsor.ca -U username -d db_name
Connect to a database from your application:
- When connecting to a database from your application, e.g:
<?php $pdo = new PDO( 'pgsql:host=psql.cs.uwindsor.ca;dbname=db_name, 'app_testuser', 'myPassword' ); $stmt = $pdo->query("SELECT current_user, current_database()"); print_r($stmt->fetch()); ?> - The password, must be provided in the code, we DO NOT recommend to use your UWIN username and password here!
- Alternatively, create a custom username/role for the application. (as explained in the next steps)
Create New username/role for your application (Using the web interface):
- Login to https://psql.cs.uwindsor.ca
- Right click on "Login/Group Roles" and Create a new Role

- In the new windows, select the username (always start with app_):


- In the "Privileges" tab, you must enable "Can Login"

- In the "Membership" tab, add "app_users" (this step is to allow this new user to login remotely)

- Then, we need to grant this new user, access/privileges on your database. right click on your database, and select "Properties":

- Make sure you are the owner of the database (contact IT if you cannot change it)

- In the "Security" Tab, click on the plus (+) sign, to add the new user to the database:


Create New username/role for your application (Using the command prompt):
- SSH/Login to your VM
- Connect to the database:
psql -h psql.cs.uwindsor.ca -U username-d database - Verify you are the owner of the database:
SELECT datname, pg_catalog.pg_get_userbyid(datdba) FROM pg_database WHERE datname = 'database';If you are not the owner, contact CS IT and ask them to change the owner of the database.
- Create a new application role/username:
CREATE ROLE app_testing LOGIN PASSWORD 'password'; - Grant the new username/role access to app_users (so you can login with the new username):
GRANT app_users TO app_testing; - Grant the new username access to your database:
GRANT ALL ON DATABASE "az-testsis" TO app_testing;
Now you can use the new username and password to access your database from your web application.
AV 300 Ouellette
We have AV in the classroom, two labs, and a Seminar area.
We have multiple TVs on the cart.
Seminar Areas and Lab:
Resources:
Viewsonic commercial displays (3 numbers) in the Seminar area.
Viewsonic commercial displays (2 numbers) in each of the Lab, the North Lab, and the South Lab.
The following provides information on Viewsonic Displays.
Do Not:
Do not randomly switch on and off the Displays if they are not working or if they have a Red light indicator on and the Display is Black or Unresponsive.
Do not disconnect HDMI cables or fight with the existing cables.
Do not go to any other machines or displays and remove the HDMI cables, and try to connect to the not-working display, assuming it will work. In this process, you are disturbing and crippling a working environment.
What should you do?
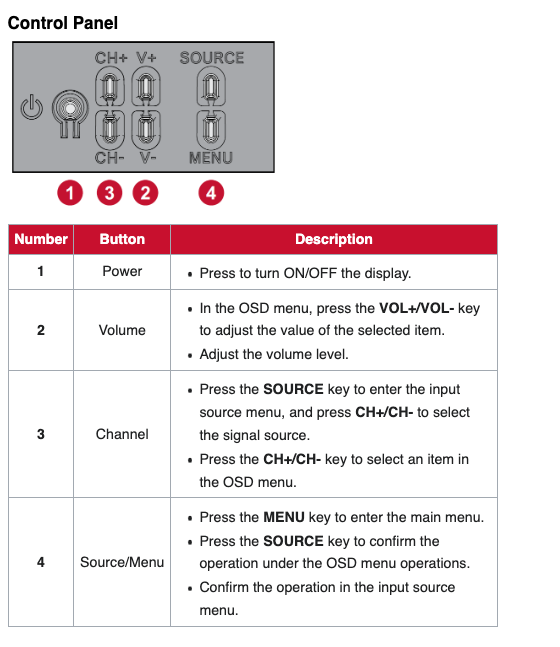
The following is the pictorial view of the displays.

You will find the following panel.
The following is the process you should follow.
1) The screen is black, unresponsive, and the light is Red; the issue could be with power, connections, or internal components.
2) First, ensure the power cable is securely plugged into both the display and a working outlet.
3) Try a different power cable and outlet to rule out power issues.
4) If the screen still doesn't display, try a power reset by unplugging the power cable, holding the power button for 30 seconds (button number 1 in the above picture), and then plugging it back in.
5) If that doesn't work, you might need to check the video cable and ensure it's properly connected. If the issue persists, you might need to contact CS support for further troubleshooting.
6) Please get in touch with the staff and report the problem. If the staff has a spare cable, you can ask and try it out.